9.05.2009

Surprise Sausage Muffins

[Back from summer vacation! And by "vacation" I mean "full-time job." BUT I am back, that’s the important thing.]

You heard me. Sausage. Muffins. Together at last! The “surprise” part comes from the fact that you can’t tell they contain sausage… UNTIL YOU BITE INTO IT:

As you may remember, I love anything that I can make muffin- or cupcake- shaped. However, though you’d never know it from the hundreds of cupcakes and desserts I’ve photographed for this blog, I try not to eat a lot of sugar. This combines the best of both worlds: a muffin, but not sweet! And I’m a sucker for almost anything with cornmeal in it.

This recipe is perfect for a filling on-the-go breakfast (or snack). I am generally not a fan of store-bought meat analogs, but Tofurkey’s beer brats are good and much less time-consuming than making one’s own sausages. Any non-breakfast [ie, crumbly] sausages will do. These muffins are best with gravy or something cheesy (if you’re in a hurry, I have a “Speedy Cheesy Cheater Gravy” recipe below), because they can be a little dry, depending on what kind of sausage you use.

I was inspired by a very non-vegan version of this somewhere on cooks.com, but I changed it a lot AND can’t find the original anymore anyway, so I am not giving you a link. If you have a favorite cornbread/muffin recipe, feel free to use it instead of the batter I give you below, but remember to add the pepper!
Surprise Sausage Muffins

3 Tofurky Beer Brats, each sliced into 4 pieces
(any non-breakfast sausage links will do, though you may need to adjust how many sausages/slices depending on their size. Basically, you want the slices to be around an inch and a half)
1 C non-dairy milk
1 Tbsp vinegar
2 T flax meal
1 C cornmeal
1 C flour (all purpose, or up to half whole wheat pastry flour)
4 tsp baking powder
1/2 tsp salt
¼ tsp black pepper

Preheat the oven to 350 and grease a muffin pan (or put in muffin cups).

Stir together the milk, vinegar, and flaxmeal in a small bowl or large measuring cup. Stir it really well, then let it sit for at least 5 minutes. In the meantime, combine the cornmeal, flour, baking powder, salt and pepper in a large bowl. Add the oil to the milk mixture (it won’t combine well, but that’s okay), then stir the liquid ingredients in with the dry ones until there are no major lumps.

NOW. Fill the muffin cups ONLY HALF WAY, then put a sausage chunk in each half-filled muffin cup. Like so:
Once you’ve done that, use the rest of the batter to fill the muffin cups completely. Bake 15-20 minutes, until the tops start to turn slightly gold-brown. Let cool slightly before serving. Top, if you want, with vegan margarine or:

Speedy Cheesy Cheater Gravy

I’m almost embarrassed to post this because it’s so simple and silly. However, it tastes like more than the sum of its parts and is ready in five minutes or less. This will
generously cover 4 muffins, but as it is so simple it doubles/triples well. It doesn’t keep, though, so eat it all.

up to 1 C water
2 Tbsp yellow (mild) miso
2 Tbsp Earth Balance*
1/8 tsp black pepper

Set the water to boil. While it’s heating up, in a small bowl, mash the miso and Earth Balance/margarine/your fat of choice with a fork until they are really well combined. When the water is boils, remove it from heat and add 1/4 cup of it to the miso/fat mixture. Fork or whisk it until it is a lumpless, thick sauce. Add more water, ONE TABLESPOON AT A TIME, until it is the consistency you desire. Pour on top of Surprise Sausage Muffins or whatever you wanted a Speedy Cheesy Cheater Gravy for in the first place.

*-I recommend this, but you can use other vegan margarine, OR olive oil but if you use oil you will probably end up using less water.

And it would not be a triumphant return if I didn’t post at least SOME cupcakes.
These are from the beginning of the summer, so I forget if they were anything other than just chocolate cupcakes, but they are topped with Sweet and Sara vegan marshmallows, which make me really happy.
I didn’t take a picture of the inside, but these are the orange cream-filled cupcakes from vegan cupcakes take over the world. I brought them in for coworkers within my first couple weeks of work and gained respect as the best baker EVER. Thanks, VCTOtW.

The disadvantage to not blogging over the summer was that I wasn’t at all tempted to write down recipes for things, so when I made up my own recipe for banana cupcakes, I dind’t bother to record it. I LOVED THEM AND I WISH I DID. Some are topped with chocolate, some are topped with a cinnamon icing, and some are both. Though I usually go for chocolate everything, I actually liked the cinnamon-topped ones best.

Next week, I think I should try to stay away from sweets and even muffin-shaped things altogether. Maybe an Indian food post!? I am constantly experimenting in nightshade free Indian cooking.

5.18.2009

cupcakes and pie

Today is a happy day for me, and I wanted to write a post that would make other people happy. SO I FILLED IT WITH CUPCAKES.

Basically I have turned into "the cupcake girl" amongst my friends. I don't know how it happened, but I started bringing cupcakes to almost every social gathering I attended. Now I can't stop! These are all from Vegan Cupcakes Take over the World.

Black Forest Cupcakes (which are a variation on the Chocolate Cherry cupcakes). I ended up using the leftover kirsch to make Kirsch Cupcakes for a different party, which were vanilla cupcakes with a Tbsp of Kirsch in the patter, then decorated with the leftover cherry sauce from these, and drizzled with a kirsch-and-sugar glaze. They went over well and I took no pictures. Anyway they weren't quite as pretty as these.

Chocolate Mint Cupcakes. Something about these reminds me of tuxedos and that makes me happy.

Mucho Margarita Cupcakes! I don't believe in food coloring, so I was worried they wouldn't have enough pizzazz, but they were super-cute and delicious nonetheless.

Earl Grey Cupcakes! A variation on the Chai Latte Cupcakes, these involved Earl Grey tea and a lot of citrusy things.

Finally, a recipe for you. The reason this is such a happy day for me is it's my 1-year anniversary with my boyfriend, so I thought the little heart-shaped pie below would be appropriate. Not only is it cute, but good lord. Even when I screw up the crust so it's ugly (but heart-shaped!) and maybe a little overdone, this blueberry pie recipe, one my great-grandmother used to make, might be the greatest pie ever. And I do not make such claims about pie lightly.

Great-Grandma's Blueberry Pie

Note: I'm not going to give you a recipe for pie crust, because 1.) everyone has their own favorite, 2.) I have trouble making pie crusts, so I am the last person who should instruct you on how to make one. This pie is best with a top and bottom crust. I ran out of crust for mine: I ended up with only enough for a bottom, and then salvaged some scraps to make decorations for the top.


Pie Crust (see note above)

2 1/2 Cup Fresh Blueberries (a little more than a pint).
1 Cup Sugar
1/4 Cup Flour (all purpose or whole wheat pastry will do)
1/8 tsp salt
1 tsp lemon juice
2 Tbsp margarine, divided

Preheat the oven to 450.

Prepare your pie crust however you like to prepare it, put the bottom crust in the pie plate.

Wash the blueberries thoroughly and put them in a large bowl. Sprinkle the sugar, flour, and salt over them, then mix until all the berries are coated. Pour over the lemon juice and mix again.

Pour the berry mixture into the pie crust and smooth the surface. Divide the margarine into 6-8 pieces and "dot" the berry mixture with them, about 2 inches between each (this is not a science, though, so no worries). Cover with your top crust (or cheesy decorative crust bits, like mine) and HERE is the catch: Bake at 450 for 10 minutes, then turn the oven DOWN to 350 and bake for another 30 minutes.

Let the pie cool a while before you serve it, but if at all possible, serve it warm, because then it is basically love on a plate. Even if it's not heart shaped.

Great with soy ice cream, but sometimes I just put it in a bowl and pour soymilk over top instead and that is also delicious.

5.07.2009

riz provencal

50% paella and 50% risotto, this french-themed rice dish is 100% delicious. This recipe is very easy to adapt depending on what ingredients you have on hand; the only thing you shouldn't replace if you can help it are the herbes de provence. You can use a variety of vegetables and can omit anything you don't have. I use (and recommend) pre-cooked brown sticky or sweet rice, but you can use white sticky rice OR arborio rice. Variations follow the recipe.
Riz Provencal
Serves 2 as a light meal or as a very generous side dish.

2 Tbsp Olive Oil (divided)
3-4 medium to large parsnips, peeled and chopped
1 Cup Broccoli
1 Cup frozen peas
1/2 tsp salt
black pepper to taste
2 figs (fresh or dried), chopped
2 Cups pre-cooked brown sticky rice (see below for alternatives)
1/2 Cup water
1 1/2 tsp herbes de provence, crushed in your hand
several chopped olives (for garnish)

In a medium-to-large skillet, heat 1 Tbsp olive oil over medium heat. Add parsnips, saute 5 minutes, until just starting to be tender and/or browning. Add broccoli, saute 5 more minutes, then add the peas, salt, pepper, and figs. Saute 2-3 minutes, just enough so that everything is mixed and starting to warm up. Add the rice, water, herbes de provence, and the remaining Tbsp of oil; stir frequently until almost all of the water is absorbed; 5-10 minutes, depending on your definition of "medium heat." Top with Olives, and/or some toasted nuts.

Variations:
You can add about 1 cup almost any chopped vegetables to the existing recipe or use them to replace something you don't want. Add them when you add the broccoli (except for harder vegetables like beets or carrots; add them with or instead of the parsnips) Some recommendations that keep with the provencal theme: mushrooms, 1-inch chunks of asparagus, carrots, tomatoes or peppers (if you can eat them), 3-4 chopped chestnuts.

4.14.2009

taro root!

My conference went well, and March disappeared without another blog post. April is also looking busy, what with a gig last weekend (maybe if you're lucky, I'll post a picture of me playing!) and approximately a MILLION pages' worth of papers due by the first week of May... But I will try to post at least twice this month. As usual (the trying, not the post count).

I mostly know taro root as one of two things: a crossword puzzle answer for "Hawaiian vegetable" or as a purply chip in a bag of terra chips. But I see them (and purple-colored taro flavored desserts) whenever I go to the Super 88 Market (Asian market), and I always think "Someday I am going to buy one." I actually bought one once and then didn't use it in time... it molded in my fridge. Ashamed at wasting a taro root, the next time I bought one, I brought it home and used it RIGHT AWAY.

I washed it, peeled it and chopped it into chunks. It has a sort of sticky, creamy starchiness to it, as you can see from the knife. And it smelled a little weirder than I thought it would.

But I pressed bravely on! I boiled the chunks for 30ish minutes until soft, drained them and mashed them with some garlic powder and olive oil. The resulting mashed taro root was DELICIOUS, gorgeous (lavender!) and surprisingly similar to my mother's garlic mashed potatoes.
I served half of it mashed, just like that (though when reheating leftovers, I ended up adding a bit of soymilk), and used the rest to make:
TARO PATTIES

1 large adult taro root (about the size of a coconut), or several (6?) baby taro roots
1 clove garlic, or 1/2 tsp garlic powder
1/2 tsp salt
4-5 Tbsp olive oil (divided)
1 tsp dried herb(s) of your choice (optional, for additional flavor, but the taro and garlic are good enough on their own)
cornmeal or flour for dredging (optional, but gives patties a crunchier outside)

Peel taro root, chop it into chunks, and boil in lightly salted water until soft (20-30 mins, depending on size of chunks). Drain, then mash with the salt, garlic powder, 2 Tbsp of the olive oil, and herbs if using. Heat 2 tbsp olive oil in a skillet over medium-high heat. Shape the taro root into patties. If using the cornmeal or flour, dredge each side of each patty in it before placing it into the skillet. If NOT using cornmeal or flour, make sure the oil is hot before you put the patties in the pan, or they will stick. Cook 3-5 minutes on each side, adding a bit of extra oil for each batch (the patties, particularly if they have a coating, will soak up oil). A large taro root makes 8-12 patties, depending on how big you shape them.

Serve on buns or by themselves, with ketchup or chutney.

3.04.2009

cornbread, or, I'm goin' south!

I'm flying down to Tampa, Florida this weekend to present one of my papers at a graduate conference. This couldn't come at a better time, as this happened here in Boston the other night:
And on the SAME DAY it was 80 degrees in Florida! I am excited for the conference. And nervous. Anyway, in honor of heading south, I present you with a southern meal!
Southern-fried tofu with a tomato-free barbeque sauce (no recipe yet, I'm perfecting it), collard greens, and cornbread! I love almost all things that involve cornmeal, and I'm always in search of the perfect cornbread. This time I used the cornbread recipe from Veganomicon, which is decent. I left out the corn kernels, though.

So one of the best parts about making cornbread is making more than you need, because then you can have it for multiple meals! I had it with leftovers, I had it for breakfast with agave and soymilk:

And then I still had a lot of cornbread that went stale. So what to do with it? I present:
Roasted Sweet Potatoes with Cornbread Croutons

2 Sweet Potatoes, cut into 1/2 inch cubes
2-3 large pieces of leftover cornbread, also cubed
1 onion, quartered, then sliced
1 tsp rosemary
1/2 tsp thyme
1/2 tsp salt
1/4 tsp black pepper
3-4 Tbsp olive oil

Preheat oven to 425. Combine all of the ingredients except the oil in a large bowl, then drizzle the oil over it and stir until everything's coated with oil.

Spread on a baking sheet and bake for 25-30 minutes, taking it out to stir every 10 minutes.

This makes 2 large main servings, or 4 side servings. The picture shows it served over raw celery.

So to reward myself after my presentation, while I'm in FL, I plan to check out Grass Root Organic Restaurant. Any other recommendations for good eats in Tampa?

2.25.2009

martha stewart and lima bean hummus

I didn't know what marmalade was when I first read the Paddington Bear books as a kid. I assumed it was an English thing. And then the first time I tried marmalade, I was blown away. It's like other jams/jellies, but it's A MILLION TIMES BETTER. I have tried many kinds of marmalade, but I have never made it myself.

UNTIL NOW.
(Pictured on homemade wheat bread)
I got the recipe from Martha Stewart, but I changed it (because I never follow recipes). I halved it, first of all, which I recommend because it makes so much. I also used different oranges: two "normal" oranges and two tangelos.* But also, the amount of sugar in Martha's recipe is astronomical, so I cut it down to 1/2 cup for every cup of goop. I still thought that sounded like a lot, but the mixture was really sour, so I went with it. And it tastes delicious. And while I will probably never make it again because it's rather tedious, I am really glad to have tried it once!

Um, by the way, I now have an absurd amount of marmalade, way more than I have toast. Any recipe recommendations?

I also relied on a Martha Stewart recipe for Valentine's Day!
These are her Pecan Linzer Cookies with Cherry Filling. Again, I halved the recipe, and to veganize it, I used soy yogurt instead of egg. Also, I didn't strain the jam because that was too much work. But I didn't alter anything else (no whole wheat flour, no agave--their point was to be decadent, not healthy). They were GORGEOUS and tasted like cookies I used to get at the corner bakery when I was little.

I don't have cookie cutters, so I used a glass to cut the rounds and a knife to cut out the hearts.
Sprinkling them with sugar was fun AND pretty.

But I do not rely on Martha Stewart for everything. For example, I had some dried (white) lima beans taking up space on my shelf for to long, so I cooked them up... and realized I have no idea what to do with lima beans. So I made up a dilly lima bean hummus! This will also work with any white beans, like cannellini.
Lima Bean Hummus

2 Cups lima (or any other white) beans
1/4 to 1/2 cup fresh dill, loosely chopped
3 Tbsp Vegenaise (if you don't have/like/want vegenaise, use olive oil)
1 Tbsp lemon juice or vinegar
1/8 tsp salt (1/4 if you use olive oil instead of vegenaise)
a few twists freshly-ground black pepper
1 tsp dulse flakes or ripped-up dulse (optional but delicious)
1 tsp nutritional yeast (optional but delicious)

Blend all ingredients. It will be gross and goopy, but such is hummus.

It's good as a dip or a sandwich spread. You can also water it down and use it as a sauce for middle eastern and/or greek meals (like tahini or yogurt sauce, but healthier).

*-I do want to remind you all to use organic food whenever possible, but especially when you are using a food's peel/rind/zest.

1.28.2009

I don't follow recipes, but I hope you do

I have trouble following recipes. Though I always set out to follow someone else's recipe, by the time I am ready to serve or eat the finish product, I realize I didn't follow it at all. Most recipes have unnecessary steps or ingredients I can't eat (ie, nightshades) or ingredients I don't want to use (ie, refined sugar or white flour). I like to think of recipes as suggestions, not instructions.

Sometimes, of course, this ends in failure. But most of the time I end up with something I like... and a new recipe that is more mine than anyone else's. This following recipe is an example of that: I saw a Martha Stewart recipe for buttermilk scones with tangelos, and while I liked the idea of chopping up citrus for scones, I didn't like the actual recipe. Too much white flour, too many steps... so I have made a better recipe!

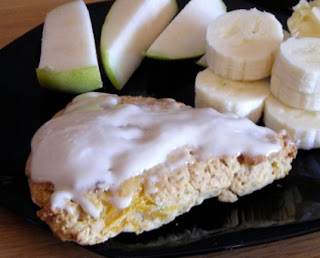
These are whole wheat orange scones, topped with cashew "clotted" cream. The cream is melty because the scones were still warm, but if you refrigerate the cream first, it holds up pretty well (recipe follows scone recipe). I was worried whole wheat scones would be too dense, but these were great.

Whole Wheat Orange Scones
(makes 6 scones)

1/4 C soymilk
1/2 tsp apple cider vinegar
1 C + 1 Tbsp whole wheat pastry flour
1 tsp baking powder
1/4 tsp baking soda
pinch salt
3 Tbsp margarine
2 Tbsp agave (or 3 Tbsp sugar, but in that case add another Tbsp soymilk)
1 tsp vanilla
1 tsp orange zest
2 medium oranges (or 3 clementines), peeled, segmented, then chopped into 1/2-inch pieces

Stir together soymilk and vinegar; set aside so it has time to curdle.

Sift the flour, baking powder, soda, and salt into a large bowl. Add the margarine in small pieces, cut into the pastry flour (with a pastry cutter or with a fork, like I do) until the mixture is clumpy, as the cookbooks say, "like coarse sand." In a separate bowl, combine the agave (or sugar), vanilla, orange zest, and soymilk mixture. Stir well, then add to the flour, with the orange segments. Don't stir this too much; some lumps are okay. It should form a sticky dough; turn this out onto a well-floured cutting board or parchment paper. With well floured hands (or put another piece of parchment paper on top), flatten the dough into an inch-thick circle.

Refrigerate the dough for half an hour. This is a good time to preheat the oven to 400. Take the dough out of the fridge and cut it into 6 triangles. Place on a lightly oiled baking sheet. (Optional: Brush tops with a bit of soy or coconut milk and sprinkle with sugar.) Bake for 18-22 minutes, until the tops are golden and the bottoms are starting to brown. Cool slightly before serving.

.

Do any of you ever have those moments where you think something like "Oh, man, where's that recipe for pineapple-and-tofu pie?" and start digging through your cookbooks before you realize there is no such thing? I frequently dream up recipes like that, and am always disappointed when I discover that no, nobody's made or sweet and sour hijiki patties. So I have to do these things myself. For some reason I had dreamed up a cashew clotted cream. This does not exist, guys. UNTIL NOW. I never had clotted cream, but when I lived in london, my flatmates were crazy about it. I can't make any promises that it tastes like clotted cream, but it tastes great and the texture is about right.

Cashew Clotted Cream
(makes enough for 6 scones)

1/4 C cashew butter
1/4 Cup + 2 Tbsp coconut milk
Optional: 1/2 tsp vanilla

Combine ingredients in a blender; blend until completely smooth (2-3 mins). Add more coconut milk to taste, but remember it will make the cream runnier at room temperature. Keep refrigerated until ready to serve.

If it's in the fridge for more than an hour, it'll firm up really well, but I don't care how firm my cashew cream is... IT IS DELICIOUS EITHER WAY. Some people sweeten their clotted cream; I think those people are crazy. This recipe is actually already a little sweet because of the cashew butter, but feel free to add a Tbsp of sugar if you want it sweeter.

1.13.2009

how sweet it is

Long time, no post! But the good news is that I now have my camera back AND a bunch of delicious desserts to share!

Gingerbread cupcakes from Vegan Cupcakes Take Over the World:
Boston Creme Cupcakes (also from VCTOtW), which I made for a dinner with my boyfriend's mother (needless to say with these babies, it went well):
Caramel Apple Cupcakes (from Veganomicon), which I brought for everyone in one of my classes last semester:
Mexican Hot Chocolate and Lemon Macadamia cupcakes (seriously, my copy of VCTOtW is near to falling apart), which I packaged up to give to a friend:
Okay, I want to do a close-up, because I love how pretty and yellow the lemon cupcakes were...
And after the cupcake overload that was my holiday season, it was only natural that my loved ones should give me cupcake-related gifts.* First off, my sister gave me this Oneida cupcake carrier! Yessss, no more squishing cupcakes into multiple tupperware containers! And my roommate gave me reusable silicone cupcake cups, so I won't go through as many cupcake wrappers!
They are really fun. And from them came my following idea for a great, not-too-sweet dessert!

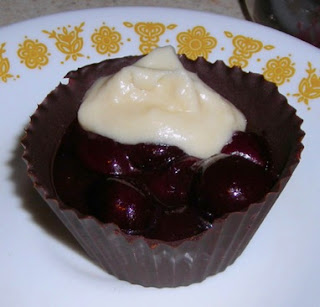
Chocolate Cherry Cups

Note: Silicone cupcake cups will make cup assembly much easier, but you can also do it with paper wrappers; just put them into a muffin tin when you chill them so they maintain their cup shape.

Chocolate shell:
2 Tbsp soymilk
4 oz unsweetened baking chocolate, chopped into tiny pieces
1/4 Cup chocolate chips
1 Tbsp butter
1-2 Tbsp agave nectar, depending on how sweet you want it
1/2 tsp vanilla

Cherry filling:
1 bag frozen cherries
1 tsp vanilla
1/2 C water
2 tsp cornstarch or arrowroot powder

Optional: buttercream frosting (I used vanilla but chocolate would be great, too) yogurt, chopped nuts or mint for topping

In a small saucepan, heat the soymilk, agave nectar, and vanilla until the mixture is near boiling (probably 2-3 minutes over medium-high heat). Remove from heat, and stir in the chocolate and the chocolate chips until they melt. Put about a tablespoon of this chocolate mixture into a silicone cupcake cup, and use a spoon to smooth the chocolate in an even layer across the bottom and about 2/3 of the way up the side of each cup. This is pretty easy, and gets easier as the chocolate starts to cool and thicken. Chill the cupcake cups for at least an hour in the freezer or longer in the fridge.

To make the cherry filling, pour the bag of cherries into a saucepan. Add the water and cook over medium until the cherries are soft, soupy and boiling; about 10 minutes. Spoon a few tablespoons' worth of the liquid into a small bowl. To this bowl, add the cornstarch or arrowroot and mix it well. Add the mixture back to the cherries and stir about 5 more minutes, until the mixture thickens. Remove from heat; chill it in the fridge for at least an hour.

To assemble, remove the wrappers from the chocolate cups, then spoon the cherry mixture into the cups. Keep them chilled until you are ready to serve them, and garnish with the optional frosting, yogurt, chopped nuts or mint.

This made 10 chocolate cherry cups.

OH I almost left out THE BEST STOCKING STUFFER EVER:
Agave nectar sticks?! I DIDN'T EVEN KNOW THEY MADE THESE.

*-Actually, it was a bit of a surprise that my christmas presents this year were ENTIRELY food-related: I also received Vegan A Go Go from my parents, and a whisk, a spatula, and a waffle iron from my sensational boyfriend. Expect waffle-related entries in the future! ^_^