I have trouble following recipes. Though I always set out to follow someone else's recipe, by the time I am ready to serve or eat the finish product, I realize I didn't follow it at all. Most recipes have unnecessary steps or ingredients I can't eat (ie, nightshades) or ingredients I don't want to use (ie, refined sugar or white flour). I like to think of recipes as suggestions, not instructions.
Sometimes, of course, this ends in failure. But most of the time I end up with something I like... and a new recipe that is more mine than anyone else's. This following recipe is an example of that: I saw a Martha Stewart recipe for buttermilk scones with tangelos, and while I liked the idea of chopping up citrus for scones, I didn't like the actual recipe. Too much white flour, too many steps... so I have made a better recipe!
These are whole wheat orange scones, topped with cashew "clotted" cream. The cream is melty because the scones were still warm, but if you refrigerate the cream first, it holds up pretty well (recipe follows scone recipe). I was worried whole wheat scones would be too dense, but these were great.
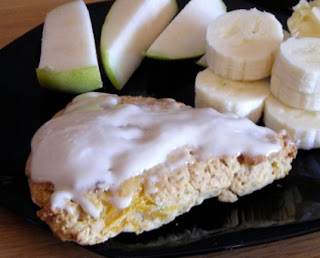
Whole Wheat Orange Scones
(makes 6 scones)
1/4 C soymilk
1/2 tsp apple cider vinegar
1 C + 1 Tbsp whole wheat pastry flour
1 tsp baking powder
1/4 tsp baking soda
pinch salt
3 Tbsp margarine
2 Tbsp agave (or 3 Tbsp sugar, but in that case add another Tbsp soymilk)
1 tsp vanilla
1 tsp orange zest
2 medium oranges (or 3 clementines), peeled, segmented, then chopped into 1/2-inch pieces
Stir together soymilk and vinegar; set aside so it has time to curdle.
Sift the flour, baking powder, soda, and salt into a large bowl. Add the margarine in small pieces, cut into the pastry flour (with a pastry cutter or with a fork, like I do) until the mixture is clumpy, as the cookbooks say, "like coarse sand." In a separate bowl, combine the agave (or sugar), vanilla, orange zest, and soymilk mixture. Stir well, then add to the flour, with the orange segments. Don't stir this too much; some lumps are okay. It should form a sticky dough; turn this out onto a well-floured cutting board or parchment paper. With well floured hands (or put another piece of parchment paper on top), flatten the dough into an inch-thick circle.
Refrigerate the dough for half an hour. This is a good time to preheat the oven to 400. Take the dough out of the fridge and cut it into 6 triangles. Place on a lightly oiled baking sheet. (Optional: Brush tops with a bit of soy or coconut milk and sprinkle with sugar.) Bake for 18-22 minutes, until the tops are golden and the bottoms are starting to brown. Cool slightly before serving.
.
Do any of you ever have those moments where you think something like "Oh, man, where's that recipe for pineapple-and-tofu pie?" and start digging through your cookbooks before you realize there is no such thing? I frequently dream up recipes like that, and am always disappointed when I discover that no, nobody's made or sweet and sour hijiki patties. So I have to do these things myself. For some reason I had dreamed up a cashew clotted cream. This does not exist, guys. UNTIL NOW. I never had clotted cream, but when I lived in london, my flatmates were crazy about it. I can't make any promises that it tastes like clotted cream, but it tastes great and the texture is about right.
Cashew Clotted Cream
(makes enough for 6 scones)
1/4 C cashew butter
1/4 Cup + 2 Tbsp coconut milk
Optional: 1/2 tsp vanilla
Combine ingredients in a blender; blend until completely smooth (2-3 mins). Add more coconut milk to taste, but remember it will make the cream runnier at room temperature. Keep refrigerated until ready to serve.
If it's in the fridge for more than an hour, it'll firm up really well, but I don't care how firm my cashew cream is... IT IS DELICIOUS EITHER WAY. Some people sweeten their clotted cream; I think those people are crazy. This recipe is actually already a little sweet because of the cashew butter, but feel free to add a Tbsp of sugar if you want it sweeter.
1.13.2009
how sweet it is
Long time, no post! But the good news is that I now have my camera back AND a bunch of delicious desserts to share!
Gingerbread cupcakes from Vegan Cupcakes Take Over the World:
Boston Creme Cupcakes (also from VCTOtW), which I made for a dinner with my boyfriend's mother (needless to say with these babies, it went well):
Caramel Apple Cupcakes (from Veganomicon), which I brought for everyone in one of my classes last semester:
Mexican Hot Chocolate and Lemon Macadamia cupcakes (seriously, my copy of VCTOtW is near to falling apart), which I packaged up to give to a friend:
Okay, I want to do a close-up, because I love how pretty and yellow the lemon cupcakes were...
And after the cupcake overload that was my holiday season, it was only natural that my loved ones should give me cupcake-related gifts.* First off, my sister gave me this Oneida cupcake carrier! Yessss, no more squishing cupcakes into multiple tupperware containers! And my roommate gave me reusable silicone cupcake cups, so I won't go through as many cupcake wrappers!
They are really fun. And from them came my following idea for a great, not-too-sweet dessert!
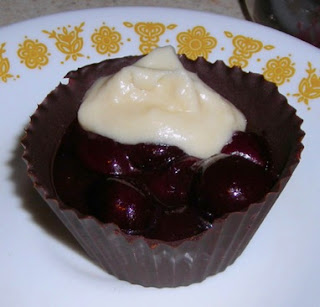
Chocolate Cherry Cups
Note: Silicone cupcake cups will make cup assembly much easier, but you can also do it with paper wrappers; just put them into a muffin tin when you chill them so they maintain their cup shape.
Chocolate shell:
2 Tbsp soymilk
4 oz unsweetened baking chocolate, chopped into tiny pieces
1/4 Cup chocolate chips
1 Tbsp butter
1-2 Tbsp agave nectar, depending on how sweet you want it
1/2 tsp vanilla
Cherry filling:
1 bag frozen cherries
1 tsp vanilla
1/2 C water
2 tsp cornstarch or arrowroot powder
Optional: buttercream frosting (I used vanilla but chocolate would be great, too) yogurt, chopped nuts or mint for topping
In a small saucepan, heat the soymilk, agave nectar, and vanilla until the mixture is near boiling (probably 2-3 minutes over medium-high heat). Remove from heat, and stir in the chocolate and the chocolate chips until they melt. Put about a tablespoon of this chocolate mixture into a silicone cupcake cup, and use a spoon to smooth the chocolate in an even layer across the bottom and about 2/3 of the way up the side of each cup. This is pretty easy, and gets easier as the chocolate starts to cool and thicken. Chill the cupcake cups for at least an hour in the freezer or longer in the fridge.
To make the cherry filling, pour the bag of cherries into a saucepan. Add the water and cook over medium until the cherries are soft, soupy and boiling; about 10 minutes. Spoon a few tablespoons' worth of the liquid into a small bowl. To this bowl, add the cornstarch or arrowroot and mix it well. Add the mixture back to the cherries and stir about 5 more minutes, until the mixture thickens. Remove from heat; chill it in the fridge for at least an hour.
To assemble, remove the wrappers from the chocolate cups, then spoon the cherry mixture into the cups. Keep them chilled until you are ready to serve them, and garnish with the optional frosting, yogurt, chopped nuts or mint.
This made 10 chocolate cherry cups.
OH I almost left out THE BEST STOCKING STUFFER EVER:
Agave nectar sticks?! I DIDN'T EVEN KNOW THEY MADE THESE.
*-Actually, it was a bit of a surprise that my christmas presents this year were ENTIRELY food-related: I also received Vegan A Go Go from my parents, and a whisk, a spatula, and a waffle iron from my sensational boyfriend. Expect waffle-related entries in the future! ^_^
Labels:
agave,
chocolate,
desserts,
fruit,
vegan cupcakes take over the world,
veganomicon
Subscribe to:
Posts (Atom)