Showing posts with label vegetables. Show all posts

9.04.2014

Restaurant Thursday: The Dining Car food truck

I'm trying to give myself a few theme days of the week, just to help me come up with some ideas for posts. Thursdays this month will be posts about restaurants!

...but this first Restaurant Thursday post is kind of sneaky, because it's about a food truck. Like most major cities these days, Boston has a great food truck scene, for vegans too! I've already written about the Taco Party vegan taco truck, and I've had some things from Clover Food Lab (vegetarian, trucks and storefronts); there are certainly many more options around the Boston area.

Kevin is a beer guy. Like the way there are people who are really into wines, Kevin is into beers. One way I try to get this across to people is to explain what I call his "Beer CSAs." There are a lot of great small craft breweries in the greater Boston area, and a few of them do series where they try an experimental style of beer, which "members" can pay for up front, and then only the "members" get to try the beer. It's a cool way to fund small breweries' new ventures, and, for a beer snob guy like Kevin, it's also a way to be able to try beers that will never be released to the greater public--and may never exist outside of that one limited bottling. Among the breweries we love that do this in the area are Night Shift brewing, Mystic brewing, and Idle Hands brewing.

Night Shift doesn't serve food, but they encourage people to bring food to their bar/pouring room so you can stick around a while. To that end, they have a food truck there many nights of the week. When we've been in the past, it was usually a grilled cheese truck (sigh), but the last time we were there, it was the Dining Car! They don't have vegan meal options, but their signature side dish is Crispy Cauliflower, which is gluten free and vegan without the aioli.
Crispy Cauliflower and Kevin's "beer CSA" pickup
IT WAS DELICIOUS. We split this one little tray but could easily have each had one (or two) to ourselves. The cauliflower is breaded with corn flour, seasoned with salt and pepper, and fried to the perfect level of crispy-but-not-greasy-ness. I didn't miss the aioli at all.

Oh, and for those interested: Night Shift, Mystic, and Idle Hands are all vegan friendly. Sometimes Night Shift will make beers with honey (or oyster shells?!) in them, but they is always clearly labeled as a special beer, so it's easy to tell. Their process itself is vegan.

9.23.2013

beets!

Recently, we'e been getting beets fairly often in our CSA share. At first, this was awesome! I love beets! And their greens! So healthy! And then around week 4 or 5 I got tired of beets. I just don't know enough different dishes for beets, I thought.

And then I started looking through photos I've taken of past meals. It turns out I have used beets in a lot of different ways. Here, for my future benefit and yours, are some of the ways I like beets the best:

Roasting is far and away my favorite way to cook beets. You wrap them in foil and back for about 40 minutes, and then the skin slides right off and they have all this amazing flavor. So here are some sliced roasted beets, drizzled with balsamic vinegar, with a raw kale salad.
 ...and of course Bac'Uns, because Kevin loves imitation bacon bits.

I've also made a really simple beet gratin by slicing beets and cooking them with herbs and lots of daiya cheese.
 But where it's really at for me with slicing and roasting beets: making free-form beet "ravioli." A lot of raw foods restaurants use thinly-sliced raw beets as the material between which to sandwich some tasty herbed nut cheese, but I like it best with roasted sliced beets.
 Above, nut-cheese-stuffed beets with an almond cream sauce; below, a very similar dish but totally smothered in a garlicky cashew cream.
 Cooking beets in stovetop dishes takes about the same amount of time, but usually doesn't lock in as much flavor as roasting, so I tend not to do that as much unless the other flavors are very strong. Here is a dish Kevin made, with the beets cooked in a mustard tahini sauce.
 And below, a beets with curried lentils.
 I've also really enjoyed a recipe from Mark Bittman's How to Cook Everything Vegetarian that involves cooking beets with black beens (and greens, but I think I added those myself).
 After the ingredients cook, you add cilantro and chopped oranges. The flavors worked really well with the beets; I didn't expect it!
And finally, a beet risotto-type dish, with chickpeas and tahini sauce.
I am such a fan of including beets in dishes! Hopefully with this compilation to refer back to, I won't ever again think "I don't know what to do with beets."

9.16.2013

okra from my garden!

I have a real garden this year, which is a new venture for me. I've been discovering the challenges (rabbits, heat waves) and joys (pesto whenever I want, and so many butternut squashes ripening!) as I go. One thing I decided to try growing this year is okra.

I associate okra with cuisine from hot places: the southern US, India, Africa. I didn't know how it would grow in a first-time gardener's New England garden. It came up kind of late in the season, and it has remained small; I figured it was too small to produce any okra. But then I got some tiny flowers, and now... some tiny okra pods!!!
 Aren't they cute? Two of them--that is, two pods--were ripe yesterday, so I picked them and mixed them with some CSA-acquired okra and other veggies to have with our dinner.
Obviously it's not like I'm growing (or able to grow) okra as a crop, but it was  cool to supplement our dinner with something from our garden.
Barbeque tofu, quinoa "risotto," and mixed roasted veggies--including our two okra pods!

9.08.2013

purple carrots

When any of us think of carrots, the first thing that comes to mind is a bright orange vegetable. But if you do some research into the history of carrots (I know, I'm a dork), you'll find that orange carrots are a relative novelty compared to  the other colors of carrots.

Remember when I wrote about yellow carrots? Until the 1600s, carrots were usually one of two colors: yellow, like I posted about before, and PURPLE.
The lighting is bad here... but these carrots were actually really dark! I got them from my CSA, and had first thought they must be a trendy new breed of carrots. Little did I know it's actually a very old strain!

A little internet sleuthing (supported by the Carrot Wikipedia page) tells me that orange carrots were cultivated in the Netherlands in the 1600s in honor of the House of Orange. Before that, any recipe that called for carrots either had white-ish, yellow, or purple carrots!
They taste just the same as orange carrots, but feel much more historic (ha ha). Here we enjoyed them raw in a salad.

10.09.2012

there are always pickles in my fridge


No regular reader of this blog will be surprised by the fact that I love pickles. Our CSA gave us a ridiculous amount of cucumbers this year, and the vast majority of them went straight into brine, just so I could have pickles throughout the year month week. (The husband and I eat pickles at an alarming rate.) There were so many pickles to be had that even now, more than a month after cucumber season has ended, we still even have some pickles left!
In the big jar on the left, Bread and Butter Pickles from Recipe Girl. These were so good this is half of a double batch--and this double batch was the second time I'd made them this summer! The first time I made them, they were good, but felt like they were missing something: cloves. I added about 1/2 tsp of cloves to the recipe the second time I made it. If you make these pickles, DO THAT. It really adds an extra "oomph" to the tastiness. Thinly sliced onions make such a great addition to pickles, I can't believe more recipes don't include them.

In the middle, Garlic-Dill pickles from the Kitchn. I had enough to make 3 jars of this, and gave away one as a gift. These were a little saltier than I would have liked, but the garlic flavor is nice and strong. I'd make them again, but next time I might cut down on the salt.

Finally, on the far right is something to do with leftover pickle brine: use it to pickle more things! Like... Pickled Carrots! The jar is cloudy from condensation; the brine is the same clear yellow as the Bread and Butter pickles. I simply julienned some carrots and stuck them in the brine. They needed to soak longer than if I'd blanched them first, and they were always quite crispy, but they absorbed just the right amount of flavor.

For the record, I only ever make refrigerator pickles; I never can them. But I've been thinking of trying my hand at canning this fall, in preparation for making edible holiday gifts. I've been doing some preliminary research, but are there any canners out there with advice for someone new to canning (who doesn't want to buy a whole huge set of equpiment)?

10.03.2012

grilled kale


I love kale. It's so versatile, fitting into almost any cuisine, and delicious prepared in any way: steaming, frying, baking, braising, etc. I ALSO love grilled food. Grilling, to me, is like roasting-it makes almost any food even more delicious than it was to begin with. So when I encountered Rachael Ray's recipe for Grilled Tuscan Kale, I had to try it. (For the record, the amount of oil the recipe calls for is ridiculous. I used less than half of what they said, and everything turned out fine. And it already seemed oily enough.)
The process! On the far right, the garlicky, vinegary, raw kale, then in the center, said kale on the grill, and in the baking pan on the far left, the first batch all crispy and ready to be eaten!

The husband and I don't have a real (ie, big, outdoor) grill, but we do have an electric grill that my mother-in-law gave us! Because it's small, it took 3-4 batches to properly grill one bunch of kale. Each batch took 3-4 minutes, so it wasn't much of an ordeal, though I'd really prefer to do this on a big grill where you could just lay them all out any be done with it.

We had it as a side with barbeque tofu and rice pilaf. You can only really eat this kale with your fingers!


Taste-wise, I would definitely make these again. The leaves get all crisp like kale chips, and the stems get softer and more tender. The garlic/vinegar/lemon juice combo sets off the kale's toastiness just enough. However, space-wise, I might wait until we get a real (big) grill to make the recipe once more.

10.27.2011

a LOT of stuffed squash

For me, this has been the VeganMoFo of epic posts. I had an epic pizza post, an epic soup post, a long socca post, and each of my Sunday brunch posts have a bunch of one thing per day. I tend to stockpile pictures for future blog posts that never quite get written, and VeganMoFo is a great way to get all those pictures/posts out.
I really like squash, and one of my favorite ways to cook with it is to stuff it with other food and then roast it. Sometime's it's simple, like the above squash stuffed with greens, raisins, and pepitas. But mostly my stuffings consist of grains flavored with herbs and spices and mixed or topped with a protein like beans or nuts.
This one has chickpeas, spinach, and... some grain, it's hard to tell. I often also mix in nutritional yeast or miso to give it a cheesy flavor.

Lentils and bulgur!
Topped with Your Vegan Mom's Vegan Parmesan.

I don't remember what's in this one, but the picture is making me want artichokes.
I can see pecans and chard in there.

Lentils, peas, and spinach. Protein and greens, whoo!

Zucchini is a summer squash, so it still counts, right? I know there's quinoa in it, because I always make more filling than I have room for stuffing, so I always end up with a side serving of the filling as well.

I think that's all the stuffed squash pictures I have stockpiled...

BUT WAIT!
A stuffed onion! I made a "cheesy mushroom" mixture with a nutritional-yeast-based cheese sauce and mushrooms, and had my grain on the site this time. Not squash, but still fills my obsession with stuffed vegetables

10.06.2011

grilled endive

We've been getting endives in our CSA share pretty often this summer. They're awfully cute, and the leaves hold their structure well enough that they make great little boats for serving small portions.
But as cute as endives are, they are very bitter, so there are only so many salads I want to use them in. You may remember from my June post on Grilled Romaine Hearts that I like everything better grilled, so I decided to use the same method on endives. (To see how to do it yourself, check out the grilled romaine hearts entry. It's the same, though I found the endive took about a minute longer to cook.)
I thought some of the bitterness would cook off, but it does not, so I recommend either drizzling a creamy or sweet salad dressing or sauce over it, or serving it alongside something bland and/or something sweet, to help cut the bitterness.

Endive is bitter, especially this late in the season, but it's also a really interesting flavor, one that can add a kick to your meal. Just make sure you play it off more neutral flavors!

6.30.2011

"Food from Literature" is on summer break. Here are some pickles!

Last month I promised you two "Food From Literature" posts in June... and I have not followed through. While I've been doing a lot of reading, the heat has meant that i haven't been as interested in trying new, long-cooking recipes. I've felt so guilty about falling behind on that, though, that I got stressed out and stayed away from my blog altogether.

And then I realized: it's summer! There is no reason to be stressed, nor is there any strong argument for sitting in front of my computer typing blog entries when I could be enjoying the weather! Plus, this time of year is when students take breaks from academics--so I am declaring a summer hiatus of "Food From Literature." We will resume in the fall! In the meantime, I won't feel guilty for post content/lack thereof.

I think I write about pickled vegetables a lot, but I love them. I love them so much that when my parents accidentally ordered a case of half-gallon jars of dill pickles for their natural food store, they gave two to me and the boyfriend, and it took us surprisingly little time to go through them.
One half-gallon jar of pickles.
Once, when I was making the Beer Battered Tofu recipe from Vegan Brunch,, I had some leftover batter. I don't like throwing away food if I can help it, so I looked around the kitchen for what else I could batter and fry. And then it hit me: PICKLES.
They're on the left; the tofu is on the right. Deep-fried pickles are a special treat, obviously, but ohhhhhh man if you have the opportunity to try them, you should.

I love summer, and I love almost everything that comes with it. (The one exception being how hot our apartment gets. But I'd rather be hot than cold, so it's tolerable.) One thing I'm really looking forward to this summer is when the farmer's market starts selling local watermelons! I love watermelon, and I recently ran out of my stash of Citrus-and-Spice Pickled Watermelon Rind. I made them two summers ago, and as you can see, I had quite a few:
And this was after I halved the recipe! I got the recipe from Bryant Terry's Vegan Soul Kitchen, and I LOVED it. The pickles don't taste like watermelon, but the syrupy, spicy brine (spiced with cloves) does taste like sweet, down-home pickles my elderly Scottish and Irish great-aunts used to make and bring to family events. Basically, they taste like summer, and like childhood. I love Bryant Terry's book, but if you can't get it, you can find the recipe here.

Whew, and now onto July! Maybe our hot apartment isn't the one thing I dislike about summer; I also dislike how quickly it goes by!

6.23.2011

nightshade-free kimchi

I really love Korean food. Let me rephrase that: I really loved Korean food before I developed an intolerance for nightshades and could no longer eat many of my favorite Korean dishes. It's possible (and easy) to find nightshade-free vegan Korean food (like tofu bi bim bap, my favorite dish to order at Korean places), but I really miss the pungent, spicy hot sauces and condiments characteristic of Korean cuisine. In particular, I miss kimchi.

If you've had kimchi before, I don't need to explain; you understand how sad it is not to be able to have it. If you haven't had kimchi before, it's a standard--no, the standard Korean condiment or side dish. It is very spicy fermented/pickled cabbage, with other vegetables and seasonings thrown in. While many restaurants' kimchi has fish ingredients in it, all the Korean places I've been to have also had fish-free kimchi if you ask for it specifically. However, the point of kimchi is to be spicy, so while it can be easy to get vegan kimchi, nightshade-free kimchi has been a longtime unfulfilled fantasy of mine.

Well, readers, it is a fantasy NO LONGER! It is A REALITY. I am seriously excited about this, if you can't tell from all those capital letters. This recipe has been years in the making. Over the last three (almost four!) years, I've scoured cookbooks and the internet for dozens of kimchi recipes, and took a little from here, a little from there, picked and chose the methods I thought would work best, experimented with fermenting and pickling other foods, and brainstormed. When a big old napa cabbage came in my CSA order a couple weeks ago, I knew it was time.
Kimchi is very easy to make, but it sounds intimidating because 1.) it takes a lot of time, and 2.) you ferment stuff. Do not let this intimidate you! (It intimidated me, which is part of why it took me years to actually make some.) If you can have nightshades, feel free to add a diced hot pepper or two. You'll be pleasantly surprised at how spicy my nightshade-free version is, though! Raw garlic, ginger, scallions, and generous sprinklings of sichuan and black pepper give this version enough heat that even my pour-hot-sauce-on-everything boyfriend thought it had a good kick. We had some with dinner last night and my mouth burned a little and I was halfway through a spontaneous happy dance before I even registered I was dancing. That's how good kimchi is. And it's BACK IN MY LIFE.

Blog readers, I present to you my baby. Some notes before you get started:
  1. You don't need to have a large mason jar to make it, but you do want a large glass sealable container of some sort.
  2. Because you're fermenting things here, you're going to want to sterilizer said glass container. You can do this by submerging it in boiling water for 10 seconds.
  3. Use the freshest ingredients you can. Your tastebuds and stomach will thank you.
  4. Making the kimchi is a two-day process, then you store it for 4 days, so if you want a meal with kimchi, you'll have to plan ahead!
Vegan Nightshade-Free Kimchi
Makes a lot of servings.

1 large napa cabbage
salt
4-5 scallions (I used a whole bunch but found this to be too many; I'd say half a bunch, which I estimate to be 4-5, will be best)
6 cloves of garlic
2-inch chunk or a little larger of ginger
2 (small) carrots or 1 large one
black pepper, and sichuan pepper, if you can get it, ground

Get a large bowl and fill it with very salty water--I'd say 1/2 cup of salt for 4-6 cups of water. Dissolve the salt in the water.

Wash your cabbage well, then chop into 2-inch chunks. Put the cabbage into the salt water. To stop it from floating, put a plate on top of it in the bowl,, then put something heavy on top of the plate. Like so:
Let this sit at room temperature for at least 12 hours. (I did it in the evening, then came back to it the next day after work.) Then drain the cabbage, but save some of the brine.
Rinse the cabbage really well under cold water.
If you're like me, you'll be shocked at how much it reduced. Now get all your other ingredients.
Grate the carrots into a large bowl, preferably glass. Then chop up the garlic and ginger as tiny as you can. A garlic crusher might be good in this situation if you have one (I don't), as would a ginger grater. Chop the scallions however you like; I did inch-long segments, split down the middle, but I think I'll do smaller next time.
To these ingredients, generously add freshly-ground black and sichuan pepper. Then add the napa cabbage, and mix it all up really well. It's easiest to do with your hands. This is kimchi! Or it's going to be soon. Put it into your glass container.
REALLY pack it in there. It's going to seem like it can't fit, but it can! There will be some juice in the jar; if it isn't enough to cover the top of the kimchi, add enough brine just to cover the top.

Now this part that sounds tricky, but isn't really. Because everything's fermenting, any bits of vegetable that are floating above the liquid could end up with mold on them, so you want everything to be submerged. Easier said than done though, right? A simple way to keep things from being exposed to air is to stuff a ziplock bag in on top of the kimchi. Fill the ziplock bag with water until the water-filled ziplock bag fills the empty space in the kimchi jar. Fold the sides of the plastic bag over the sides of the glass container, and close the lid, around the plastic bag.

Voila! Refrigerate for 4-6 days. If your place is cool, you can leave it in a cool, dark place out for a day first, to speed along fermentation, but since it's June in Boston, that was not an option for me.

After 4-6 days, remove the zip lock bag and enjoy!

Kimchi with tofu fishsticks (the boyfriend says I make this dish more often than any other. If this is a bad thing, I don't want to be good), wasabi sauce, greens, and miso-sesame mashed sweet potatoes.
Kimchi is good as a side for many Asian-themed meals. It is also delicious as a topping for plain rice, a last minute stir-in for stir-fries, over noodles, and in soups and stews.

6.12.2011

grilled romaine hearts

It's grilling season! Just like I believe all vegetables get tastier when roasted, I believe that all food is better grilled.
Grilled tofu, corn, and bread with a (not grilled) salad, from last summer.
I'm a big fan of the smokey flavor charcoal/wood-burning grills impart, but I take what I can get. Being city dwellers, we don't have a grill, nor do we have a place to put one, but we have a cast-iron grill pan, which is the next best thing. I like that grill pains allow you to control the temperature (and therefore cooking time) a lot better than a real grill can.

Grilled romaine hearts are delicious, quick, and simple. They are, in fact, so easy to make that I almost feel embarrassed giving you a recipe. It's been a while since I've posted an actual recipe, though, so I'm going to do so anyway.
Grilled Romaine Hearts
If this dish is a side to a big meal, one romaine half per person will do. If it's a small or simple meal, use one heart (two halves) per person.
2 hearts of romaine
2 Tbsp olive oil
salt and pepper, to taste (a few shakes of each)

Heat your grill. If you're cooking with a grill pan, you want to heat it on medium. While it's heating, pull away any outer leaves on the romaine hearts that look limp or are falling away from the rest of the heart. Cut the hearts down the middle, length-wise, so you have two long, matching halves.

Brush each side of the romaine hearts with olive oil, then set them down on the grill, cut side down. Shake a little salt and pepper over the side that's facing you.

Cook for about 2 minutes; the edges should look a little wilty in parts and brown in others. (If your grill/pan isn't totally hot yet, this could take 3-4 minutes, but watch it closely.) Flip the hearts, sprinkle this side with a little salt and pepper, then cook till that side is brown/wilty, another 2 minutes.

That's it! The only garnish you need is a little more salt and/or pepper, if you are so inclined. The grill turns what is essentially salad into a sophisticated-tasting side dish.
You'll have to cut it with a fork and knife, but that will give you a reason to use all those steak knives you have in a drawer and rarely have a reason to use. I like to think it adds t the sophistication. Serve with whatever else you have on the grill/pan, like here with grilled tempeh on a bed of grilled onions. Grilled avocado is also a great topper, to keep with more side-salad-like ingredients.

5.31.2011

Golden Beets

I tried to get a "food in books" post up and running for you for this month, but it looks like we'll just have to double up next month, because I haven't had time. BUT sneak preview: I'll be cooking from Hardy's The Mayor of Casterbridge, and if you've read the book I bet you can guess what I'll be making. If you haven't, you're in for a (mushy) treat.

This entry is devoted to yellow food that isn't usually yellow. Namely, the Golden Beet. It may just be that I like yellow better than pink, but I personally think that golden beets taste better than their red counterparts--a little milder, so the flavor really stands out. You may remember that I used them in the Wild Rice Salad with Oranges and Roasted Beets in my last entry.

I really love them roasted, especially on salads:
Chopped small on a side salad (chickpea cutlet in the back! whoo!).

Making a nice beety halo around a wilted greens salad.

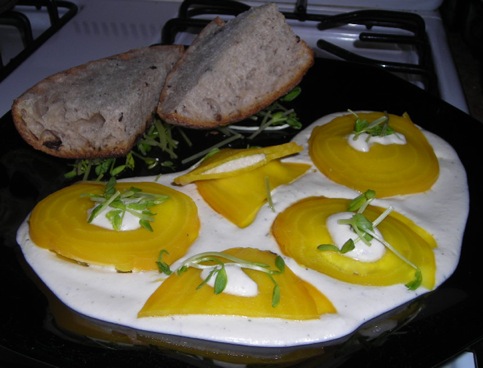
And my faaaavorite way to eat them: as raw ravioli with nut cheese!
Confession: in this picture, the beets had been roasted. But I've made this dish twice, and I swear the first time they were raw! And having bread on the side made the meal not raw anyway. The raviolis are filled with a thick almond/cashew cheese, which is watered down a little and given italian herbs to make the cream sauce. Yum!

Finally, while these aren't golden beets, they're a golden version of something else that's usually gold: carrots.
Have you ever tried yellow carrots? They taste exactly the same, but make me feel like I'm eating a different vegetable. I imagine eating purple carrots would be the same...

5.05.2011

roasted cabbage

Tired of the same old sides? Out of ideas for cabbage beyond cole slaw and sauerkraut? I have two words for you: Roasted. Cabbage.

I know it sounds crazy, but hear me out. Have you noticed that almost every vegetable becomes even more delicious when you roast it? Cabbage is no exception! It gets smooth, almost buttery, and flavorful--similar in taste to well-roasted cauliflower, but with a better texture.

I got the idea from an old Kitchn post, but that recipe calls for bacon, and to blacken the cabbage. I prefer my roasted vegetables meat-free and lower on carbon. So I made a few adjustments, including garlic instead of bacon and a shorter cooking time.

Roasted Cabbage

1 head of cabbage
5-6 cloves garlic, peeled
olive oil
salt

Preheat the oven to 450. Line a baking sheet with parchment paper. Core the cabbage, and cut it into wedges--at least 8 wedges, more if it's a very large cabbage. (Mine was rather small, as you can see in the picture below.)

Lay the cabbage wedges flat on the baking sheet. Put the garlic between the wedges, and drizzle everything generously with olive oil. Sprinkle a bit of salt on top of each wedge.
I also tried a few drops of liquid smoke on each wedge, but it cooked off and I couldn't taste it.
Bake for 15 minutes, then remove from the oven and flip each wedge. I used a fork to do it. The edges will be a little brown by now; the idea is to get them close to burnt but not burnt! SO put them back in the oven for 5 minutes. Everything should be brown-edged and fragrant; if they look a little pale, give it another 5 minutes.

Quick, easy, delicious, and unexpected! This is an awesome side dish for almost anything. Annnnd such a quick and easy side dish means you can spend more time outside enjoying the spring weather, like I've been doing!*
*-This is why I only got around to updating 3 times in April. Oops.
Swan boats! And cherry trees. The boyfriend and I walked through the Public  Garden last weekend and saw 3 weddings, 1 proposal, and 1 one-man band; a busy spring day!