February and March have been really busy months. We're looking for a house while trying to sell our own place, my job has been especially busy, I've started taking yoga courses, and I've been trying to get outside in this amazing weather as much as possible.
I don't really have time to sit and write a full recipe or how-to post. But I can show you some of the food I've been making lately!
First, while I didn't post about it, I "celebrated" pi day by baking a pie! I wasn't going to, since pie is a lot of work, but everyone else's blog posts about their awesome pies made me jealous. So! After work I put together possibly the quickest pie in Vegan Pie in the Sky:
Curried Macaroon Pie, with a biscoff cookie (in lieu of gingerbread cookie) crust. I didn't know how I'd feel about curry in my dessert while making it, but ohhh man I really loved it. Cookie crusts, however, tend not to be a hit with me because they're so sweet--I ended up giving my crust to Kevin (the husband) every time we ate it.
That was not the only pie I've consumed of late! We had a game night with our friends recently, and since one of them is gluten intolerant, I tried a recipe I've been wanting to try for a long time:
Chocolate Covered Katie's Deep Dish Cookie Pie, which is gluten-free if you use gf oats. Mine has kind of a marbled top since my chocolate chips started melting. The recipe calls for beans--white or garbanzo. I used garbanzo, but would probably use navy beans next time--I thought I could taste the beans a little bit, but no one else at the table could. That recipe is definitely a keeper.
I'll stick with this pie theme for one more:
My Valentine's Day present from Kevin was a Maple Blueberry Pie (also from Vegan Pie in the Sky.) We were a little short on blueberries, so he tossed in some blackberries, which made for nice, juicy surprises in every slice.
Much to his horror, I proceeded to have it for breakfast every day, too. Breakfast pie is the best pie!
He also made me an enormous, decadent meal from The Voluptuous Vegan:
A Tofu Leek Tart on top of French Lentil Sauce, with a side of Fennel and Asparagus Salad with Beets. Yummmm. I love everything I've had from that cookbook, but the recipes are often a lot of work, so the best thing is with my wonderful husband MAKES me things from there.
I also made this Damp Orange Cake recipe from The Kitchn.
I tried healthy-ing it up with all whole-wheat flour and date sugar, which made it very brown, but very tasty. I think next time I'd do it with white flour, though, since the whole wheat nuttiness sort of masked the citrus, and I looooove citrus baked goods.
On a healthier note, I've been getting into making smoothies for breakfast this week. Veggie scraps, frozen fruit, browning bananas, a little homemade nut-based yogurt, anything goes!
Green ones are my favorite.
I hope you're all enjoying this amaaaaaaazing "spring" (more like summer here) weather!
3.22.2012
2.20.2012
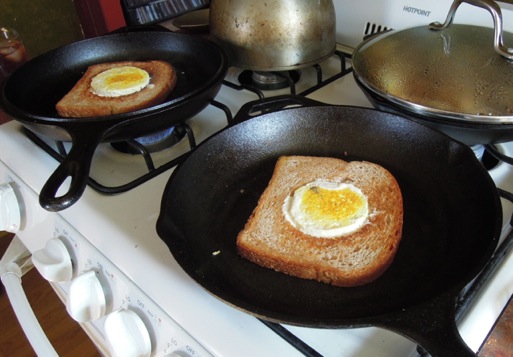
tofu in a hole
There's a classic American breakfast food that I never got to try, or even really knew about, before going vegan. Though it's commonly known as "Toad in a Hole," it is really different from the British version of Toad in the Hole. The British version is Yorkshire pudding with sausage. The American version is toast with a hole cut in the center into which you add an egg. I looked it up online and discovered that Toad in a Hole is also known as Egg in a Basket, Bird's Nest, One-eyed Jack, and Gas House Egg. Do you all know about this dish? Do you have a different name for it?
Anyway, this morning the husband wondered if I could try to make a vegan version. I've seen one recipe for a vegan version, but it takes a lot more time/advanced preparation than I had this morning... so I rose to the challenge to create my own. (You should still click that link, though, if not for that recipe than for the list of different names for Toad in a Hole. So cool!)
So, here's my version.
I fried up the tofu with my normal tofu "fried egg" method--I rub a couple pinches of black salt, asafoetida, and pepper on tofu, then saute it in oil till the edges start to get a bit golden. Making the circles left me with some tofu scraps, which I blended with water, arrowroot, a bit of nutritional yeast, and the same fried-eggy seasonings to make a binder that would stick the tofu to the bread.
I mixed a spoonful of the binder with turmeric to make the little yolks on top, but that's only for looks. The binder mixture is in the little green cup.
Then all I had to do was saute the bread:
Once I flipped the bread, I put a quarter of the blended mixture into each hole, then quickly added the tofu circles. A minute or two longer, and it was done!
The arrowroot mixture helps keep the tofu in the hole.
This breakfast was delicious, and I no longer feel like I'm missing out on an American breakfast tradition! So now I'll share it with you.
Tofu in a Hole
Serves 2, is easily doubled/tripled/quadrupled. Black salt is totally worth your time/money if you like an "eggy" flavor to things; it has a sulphur smell that becomes milder with cooking and really helps things taste like eggs. Asafoetida is a powder that smells half garlicky and half oniony, and also helps with egginess. You only use a REALLY TINY amount at a time. Both are available at any Indian grocery store, or online.
1/2 block tofu
4 pieces of bread
1 tsp arrowroot powder
3 Tbsp water
1 Tbsp nutritional yeast (optional, if not using, add a bit more arrowroot)
a few pinches of:
black pepper
black salt (optional, but IS the eggy flavor)
asafoetida (optional, but helps with eggy flavor)
turmeric (optional, only if you're doing a "yolk" look)
vegan margarine
Using a glass or small biscuit cutter, cut a hole in the center of each piece of bread. Use the same glass to press into your tofu to make circles that will fit in the bread. You can either cut the tofu into 4 slabs and then use the glass on them, or you can make one big tofu cylinder and cut that horizontally into 4 circles. It's up to you!
In a blender, combine the leftover corners of the tofu, the 1 tsp arrowroot powder (a scant 2 tsps if you don't use nutritional yeast), the water, nutritional yeast, a few pinches of black salt, and a tiny amount of asafoetida. Blend until smooth. This is your binder mixture. While it's blending, sprinkle a bit of black pepper, black salt, and asafoetida over the tofu slices, and rub into both sides.
Heat 1-2 tsps of margarine in a pan on the stove over medium. Saute the tofu circles for about 3 minutes, until the bottom is starting to turn golden. Flip, repeat. While the tofu is cooking, butter one side of each slice of bread.
(Optional, for the yolk [which is for looks only]: Before flipping, take a small spoonful of the binder mixture, and mix a sprinkle of turmeric into it. Put a small dollop in the center of each tofu slab, then flip and cook as directed above.)
Remove the tofu from the pan, add a little more margarine as necessary, then put the unbuttered side of the bread down in the pan. It should begin to brown in 3 or so minutes; check. Once the bottom has browned, flip it. Once you've flipped it, add a quarter of the binder mixture (should be a little more than a Tbsp) to the center of the hole in the bread, then press in a tofu circle (yolk side up, if you did a yolk) quickly. The binder mixture will come up around the edge of the tofu, that's good! Allow to cook until the bread is browned, again, like 3 minutes. You have Tofu in a Hole! Or Tofu in a Basket. Or Gas House Tofu. Whatever.
This parsnip mixture went really well with it:
It's parsnips and walnuts, sauteed with a bit of olive oil, salt and a splash of maple syrup. Yummmm.
Anyway, this morning the husband wondered if I could try to make a vegan version. I've seen one recipe for a vegan version, but it takes a lot more time/advanced preparation than I had this morning... so I rose to the challenge to create my own. (You should still click that link, though, if not for that recipe than for the list of different names for Toad in a Hole. So cool!)
So, here's my version.
I fried up the tofu with my normal tofu "fried egg" method--I rub a couple pinches of black salt, asafoetida, and pepper on tofu, then saute it in oil till the edges start to get a bit golden. Making the circles left me with some tofu scraps, which I blended with water, arrowroot, a bit of nutritional yeast, and the same fried-eggy seasonings to make a binder that would stick the tofu to the bread.
I mixed a spoonful of the binder with turmeric to make the little yolks on top, but that's only for looks. The binder mixture is in the little green cup.
Then all I had to do was saute the bread:
Once I flipped the bread, I put a quarter of the blended mixture into each hole, then quickly added the tofu circles. A minute or two longer, and it was done!
The arrowroot mixture helps keep the tofu in the hole.
This breakfast was delicious, and I no longer feel like I'm missing out on an American breakfast tradition! So now I'll share it with you.
Tofu in a Hole
Serves 2, is easily doubled/tripled/quadrupled. Black salt is totally worth your time/money if you like an "eggy" flavor to things; it has a sulphur smell that becomes milder with cooking and really helps things taste like eggs. Asafoetida is a powder that smells half garlicky and half oniony, and also helps with egginess. You only use a REALLY TINY amount at a time. Both are available at any Indian grocery store, or online.
1/2 block tofu
4 pieces of bread
1 tsp arrowroot powder
3 Tbsp water
1 Tbsp nutritional yeast (optional, if not using, add a bit more arrowroot)
a few pinches of:
black pepper
black salt (optional, but IS the eggy flavor)
asafoetida (optional, but helps with eggy flavor)
turmeric (optional, only if you're doing a "yolk" look)
vegan margarine
Using a glass or small biscuit cutter, cut a hole in the center of each piece of bread. Use the same glass to press into your tofu to make circles that will fit in the bread. You can either cut the tofu into 4 slabs and then use the glass on them, or you can make one big tofu cylinder and cut that horizontally into 4 circles. It's up to you!
In a blender, combine the leftover corners of the tofu, the 1 tsp arrowroot powder (a scant 2 tsps if you don't use nutritional yeast), the water, nutritional yeast, a few pinches of black salt, and a tiny amount of asafoetida. Blend until smooth. This is your binder mixture. While it's blending, sprinkle a bit of black pepper, black salt, and asafoetida over the tofu slices, and rub into both sides.
Heat 1-2 tsps of margarine in a pan on the stove over medium. Saute the tofu circles for about 3 minutes, until the bottom is starting to turn golden. Flip, repeat. While the tofu is cooking, butter one side of each slice of bread.
(Optional, for the yolk [which is for looks only]: Before flipping, take a small spoonful of the binder mixture, and mix a sprinkle of turmeric into it. Put a small dollop in the center of each tofu slab, then flip and cook as directed above.)
Remove the tofu from the pan, add a little more margarine as necessary, then put the unbuttered side of the bread down in the pan. It should begin to brown in 3 or so minutes; check. Once the bottom has browned, flip it. Once you've flipped it, add a quarter of the binder mixture (should be a little more than a Tbsp) to the center of the hole in the bread, then press in a tofu circle (yolk side up, if you did a yolk) quickly. The binder mixture will come up around the edge of the tofu, that's good! Allow to cook until the bread is browned, again, like 3 minutes. You have Tofu in a Hole! Or Tofu in a Basket. Or Gas House Tofu. Whatever.
This parsnip mixture went really well with it:
It's parsnips and walnuts, sauteed with a bit of olive oil, salt and a splash of maple syrup. Yummmm.
2.09.2012
our vegan honeymoon in New Orleans!
My month of wedding posts is over, but I've got one more wedding-related post for you: our honeymoon in New Orleans! I've wanted to visit NOLA since I was 13 or 14, and while the husband has been there a couple times and enjoyed it, we wanted to go together! We had a really lovely five-day trip over Halloween weekend, and I'm sharing it with you... just in time for mardi gras!
We stayed at a hotel with a classy little balcony from which we could see Bourbon street.
We got a suite with a little kitchenette, so we brought and bought breakfasty food and had all of our breakfasts in our room--mostly on our balcony.
During the day, we ventured around the French Quarter and beyond to see the sights--the botanical gardens, the museums, the cemeteries, etc. At night we checked out live music and the city's active night life.
I even convinced Kevin to go on a ghost tour with me! It was fun and cheesy and not at all ghosty, but I learned a bit about New Orleans's history.
But everyone knows that New Orleans is full of things to do. What you may not know is that it's pretty easy to get good vegan food there, especially if you know where to look! I had done a lot of research beforehand; I'd been nervous that even if we found vegan stuff, I wouldn't be able to eat it (cajun vegetables and spices are almost entirely nightshades). But no! We ate really well in New Orleans. Let me show you!
First, if you want to get food for your hotel room or to carry around with you, GO TO THE NEW ORLEANS FOOD CO-OP. It had just opened when we went, and the husband and I couldn't believe how big and full it was, with all the vegan staples we could think of. The workers were friendly and lovely (as were all the people we met in NOLA, actually), and they told us it was the only co-op in Louisianna! Go there, support them, get awesome food. While there, we stocked up on breakfast foods and hotel room snacks.
Another necessity for breakfast: coffee! We mostly had some in our room, but we also had some good coffee out:
La Boucherie is more vegan-friendly than the name suggsts. They had soymilk for the drinks!
We had a really great lunch at Cafe Carmo. Almost everything on their menu can be made vegan--they have daiya and some vegan "meats." They also have vegan baked goods!
I got a "plain" banquette bread with daiya and a Carmo salad. (I had it without veggie ham, since some fake meats have nightshades). The husband ordered the Vegan Rico--under the greens is vegan pulled pork and melty daiya over a grilled plantain patty. Both of our orders were deeelicious.
13 Monaghan had a tasty Baked Tofu and Herb sandwich that was nightshade free without the tomato.
I was so hungry I ate half before remembering to take a picture. They have more options if you can have nightshades--including Tachos--TATER TOT NACHOS (vegan without the cheese and sour cream). Seriously, people, if you are able to eat nightshades, can you go order this and report back to me on how AWESOME it must be?
Out near the New Orleans Food Co-op, there's a vegan Korean pop-up restaurant called The Wandering Buddha.
They operate out of the back of a bar (the Hi Ho Lounge), and you can either sit in the bar or on their patio out back.
Though all vegan, the menu isn't too flexible for nightshade-free people--the staff was a little apologetic about only having one option for me for an appetizer, and one option for me for an entree--but I was happy with what they gave me. My appetizer was gimbap (sushi), and Kevin ordered dumplings.
My entree was japchae--noodles with a sweet peanutty sauce. It looked boring when it arrived at the table, but it was flavorful and awesome. The husband got an AMAZING-looking braised tofu dish.
Because it was our honeymoon, we wanted to go out for one big, fancy, expensive dinner, so we went to Restaurant August. I'd read a yelp review that said they were able to accommodate vegans upon request. They were really attentive and great about my allergies. They modified their farmers' market tasting menu to be all vegan, and made us a delicious meal.
This bread looks like normal bread, but is some of the TASTIEST HOMEMADE BREAD I have ever had. Sorry the light is really dim in these pictures; blame it on fancy dinner mood lighting!
Our amuse-bouche was a pickled radish over... some other vegetable, with microgreens and a cilantro pesto.
Our first course: a nice salad for Kevin (in the back) with a spicy vinaigrette, and for me, a delicious sweet chilled pear consomme, with pomegranate seeds, walnuts, saffron, and edible flowers.
This picture is terrible, but our entrees were AWESOME: Kevin got spicy broccoli with fire roasted peppers, and I had fried brussel sprouts with a pecan pesto. I like brussel sprouts okay, but these were the best brussel sprouts I've ever had, hands down. They were garlicky and fried till they were crispy but not heavy.
Dessert was a fruit plate, with mango sorbet and coconut milk tapioca. And a chocolate "congratulations!" Awww.
What do you call dessert after dessert? They also gave us complimentary champagne and these little raspberry-and-coconut jelly squares. So nice!
As delicious as our meal at Restaurant August was, you may notice it was almost all vegetables. In a few hours, we were hungry again.
So we went to Bennachin for some snacks:
Plantains and black-eyed pea fritters! Nightshade free as long as you ask for the sauce on the side. While we were there for just a snack at that time, we'd gone there earlier in our visit for a really good dinner. Bennachin serves West African food, and all their vegetarian dishes are also vegan. I could get nightshade-free versions of two of the entrees on the menu. Going without spiciness made the food a little plain, but their rolls were so good it didn't matter. Also, they have a really great ginger juice drink, and a hibiscus iced tea. But the fritters were the star for me.
The husband thought it was kind of funny that we didn't eat any "traditional" New Orleans cuisine. As I said above, nothing cajun is nightshade-allergy friendly, so I wasn't looking for any, but those of you without nightshade allergies will be happy to know there are vegan po'boys and gumbos in the city. Another thing I didn't mention is Lola's. We wanted to go, but they aren't open for lunch and we were only out in that area during the day. People on the PPK forum said that their almond/garlic soup, their paella, and their aioli are vegan. We'll have to go next time. And there will be a next time! I had such a blast, I can't wait to go back!
(Even our layover in Miami was pretty good--the airport had a sushi place!)
We stayed at a hotel with a classy little balcony from which we could see Bourbon street.
We got a suite with a little kitchenette, so we brought and bought breakfasty food and had all of our breakfasts in our room--mostly on our balcony.
During the day, we ventured around the French Quarter and beyond to see the sights--the botanical gardens, the museums, the cemeteries, etc. At night we checked out live music and the city's active night life.
I even convinced Kevin to go on a ghost tour with me! It was fun and cheesy and not at all ghosty, but I learned a bit about New Orleans's history.
But everyone knows that New Orleans is full of things to do. What you may not know is that it's pretty easy to get good vegan food there, especially if you know where to look! I had done a lot of research beforehand; I'd been nervous that even if we found vegan stuff, I wouldn't be able to eat it (cajun vegetables and spices are almost entirely nightshades). But no! We ate really well in New Orleans. Let me show you!
First, if you want to get food for your hotel room or to carry around with you, GO TO THE NEW ORLEANS FOOD CO-OP. It had just opened when we went, and the husband and I couldn't believe how big and full it was, with all the vegan staples we could think of. The workers were friendly and lovely (as were all the people we met in NOLA, actually), and they told us it was the only co-op in Louisianna! Go there, support them, get awesome food. While there, we stocked up on breakfast foods and hotel room snacks.
Another necessity for breakfast: coffee! We mostly had some in our room, but we also had some good coffee out:
La Boucherie is more vegan-friendly than the name suggsts. They had soymilk for the drinks!
We had a really great lunch at Cafe Carmo. Almost everything on their menu can be made vegan--they have daiya and some vegan "meats." They also have vegan baked goods!
I got a "plain" banquette bread with daiya and a Carmo salad. (I had it without veggie ham, since some fake meats have nightshades). The husband ordered the Vegan Rico--under the greens is vegan pulled pork and melty daiya over a grilled plantain patty. Both of our orders were deeelicious.
13 Monaghan had a tasty Baked Tofu and Herb sandwich that was nightshade free without the tomato.
I was so hungry I ate half before remembering to take a picture. They have more options if you can have nightshades--including Tachos--TATER TOT NACHOS (vegan without the cheese and sour cream). Seriously, people, if you are able to eat nightshades, can you go order this and report back to me on how AWESOME it must be?
Out near the New Orleans Food Co-op, there's a vegan Korean pop-up restaurant called The Wandering Buddha.
They operate out of the back of a bar (the Hi Ho Lounge), and you can either sit in the bar or on their patio out back.
Though all vegan, the menu isn't too flexible for nightshade-free people--the staff was a little apologetic about only having one option for me for an appetizer, and one option for me for an entree--but I was happy with what they gave me. My appetizer was gimbap (sushi), and Kevin ordered dumplings.
My entree was japchae--noodles with a sweet peanutty sauce. It looked boring when it arrived at the table, but it was flavorful and awesome. The husband got an AMAZING-looking braised tofu dish.
Because it was our honeymoon, we wanted to go out for one big, fancy, expensive dinner, so we went to Restaurant August. I'd read a yelp review that said they were able to accommodate vegans upon request. They were really attentive and great about my allergies. They modified their farmers' market tasting menu to be all vegan, and made us a delicious meal.
This bread looks like normal bread, but is some of the TASTIEST HOMEMADE BREAD I have ever had. Sorry the light is really dim in these pictures; blame it on fancy dinner mood lighting!
Our amuse-bouche was a pickled radish over... some other vegetable, with microgreens and a cilantro pesto.
Our first course: a nice salad for Kevin (in the back) with a spicy vinaigrette, and for me, a delicious sweet chilled pear consomme, with pomegranate seeds, walnuts, saffron, and edible flowers.
This picture is terrible, but our entrees were AWESOME: Kevin got spicy broccoli with fire roasted peppers, and I had fried brussel sprouts with a pecan pesto. I like brussel sprouts okay, but these were the best brussel sprouts I've ever had, hands down. They were garlicky and fried till they were crispy but not heavy.
Dessert was a fruit plate, with mango sorbet and coconut milk tapioca. And a chocolate "congratulations!" Awww.
What do you call dessert after dessert? They also gave us complimentary champagne and these little raspberry-and-coconut jelly squares. So nice!
As delicious as our meal at Restaurant August was, you may notice it was almost all vegetables. In a few hours, we were hungry again.
So we went to Bennachin for some snacks:
Plantains and black-eyed pea fritters! Nightshade free as long as you ask for the sauce on the side. While we were there for just a snack at that time, we'd gone there earlier in our visit for a really good dinner. Bennachin serves West African food, and all their vegetarian dishes are also vegan. I could get nightshade-free versions of two of the entrees on the menu. Going without spiciness made the food a little plain, but their rolls were so good it didn't matter. Also, they have a really great ginger juice drink, and a hibiscus iced tea. But the fritters were the star for me.
The husband thought it was kind of funny that we didn't eat any "traditional" New Orleans cuisine. As I said above, nothing cajun is nightshade-allergy friendly, so I wasn't looking for any, but those of you without nightshade allergies will be happy to know there are vegan po'boys and gumbos in the city. Another thing I didn't mention is Lola's. We wanted to go, but they aren't open for lunch and we were only out in that area during the day. People on the PPK forum said that their almond/garlic soup, their paella, and their aioli are vegan. We'll have to go next time. And there will be a next time! I had such a blast, I can't wait to go back!
(Even our layover in Miami was pretty good--the airport had a sushi place!)
Labels:
happy,
korean,
new orleans,
restaurants,
reviews,
travel,
wedding
1.31.2012
how to dye a wedding dress
I really loved my wedding dress. It was pretty, it was simple, and it was formal enough to match the husband's tux without being a giant terrifying pile of icing. Getting it was incredibly simple: I'd looked at it for weeks online before my mother and I had a chance to get to a David's Bridal. We sat down with the saleslady there, and she asked "What kind of dress are you looking for?"
"Style number WG3313," I said.
Her jaw dropped. "You... know the number?"
So she went to find the dress, came back with the two sizes the store had in stock, and had me try one on. It fit absolutely perfectly, no alterations needed. And Bam! I had a wedding dress!
It was comfortable, pretty, and easy to dance in. Everything I wanted!
But after the wedding was over, the dress no longer had a purpose. I was a little bummed that I only got to wear this awesome dress for one day, so decided to DYE MY WEDDING DRESS. I was inspired by Sherry over at the Young House Love blog, who dyed her wedding dress an awesome gunmetal gray color. I was also aware of the fact that she'd wanted to dye it black; I was prepared before I even began for things not to turn out as I'd expected.
Here is the extent of my experience with dyeing prior to this: once, when I was Prop Master of a play in high school, I dyed a pair of white cotton gloves yellow. Which is to say, I have almost no experience dyeing things. I was originally planning to use Rit dye, just because that was the only brand I knew, but our local art store didn't carry it. I ended up going with iDye, which had the advantage of having colors for both natural and manmade fibers. (Rit is only for natural fibers.) The top layer of my dress is 52% polyester and 48% rayon. Almost all of the other layers were 100% polyester. Rit was probably not going to work. iDye recommends that for blended fabric, one should combine the normal dye with a complementary color of their "poly" dyes. I got Crimson and Red.
Let me point out right now that these are powders. As soon as I opened a packet, tiiiiny invisible particles of red dye disseminated throughout the bathroom, landing in weird places and not showing up until after our next couple showers, when the steam condensed into little tiny drops of PINK all over the surfaces of our bathroom, even the ones I had covered with a layer of catalogue pages for safety.
For polyester, you're supposed to boil the clothes in the dye for 30-60 minutes. My dress was much too big for even our largest stock pot, so instead I boiled loads of water over the stove and poured it into a storage container in our bath tub. I then added the dye, and THEN THE DRESS.
My dress is in there! Eek! Note the gloves (otherwise I'd've had blotchy red hands) and the paint stirrers: You're supposed to agitate (stir) the dress the whole time! I leaned over the bathtub and listened to an episode of This American Life. After 45 minutes, I couldn't take it anymore, so next came the final, and for me, the hardest step: rinsing the dress. You rinse the dress over and over in cold water until the water runs clear. This. Took. FOREVER. That dress held a lot of dye, let me tell you. Then I put the dress on the fire escape to dry.
While it dried I scrubbed and scrubbed the bathtub, because it had turned hideously pink.
But then, by dinner time, it was dry. AND LOOK:
The light looks dim in this one, but the color of the dress is very close to what it is in real life.
I love it! Mind you, I had expected a crimson/red dress, and this is sorta mauve with cherry red accents. And the dress was "Dry Clean Only," which all sources say not to dye... and definitely not to soak in boiling water. As a result, the heat shrunk the cloth on either side of the zipper, so the bodice shrunk by about about 1/2 an inch... which sounds negligible, except the dress had fit me PERFECTLY before. I had to wear it around the house for a couple hours breathing really deeply to stretch it back out. But it fits fine now, and above all, I think it looks great!
The color looks a little washed out from the flash in this one, but you can see the sash better. And if you look at the bottom right hem, you can see that the layer of crinoline turned cherry red!
Now I just need an occasion to wear a puffy pink dress.
"Style number WG3313," I said.
Her jaw dropped. "You... know the number?"
So she went to find the dress, came back with the two sizes the store had in stock, and had me try one on. It fit absolutely perfectly, no alterations needed. And Bam! I had a wedding dress!
It was comfortable, pretty, and easy to dance in. Everything I wanted!
But after the wedding was over, the dress no longer had a purpose. I was a little bummed that I only got to wear this awesome dress for one day, so decided to DYE MY WEDDING DRESS. I was inspired by Sherry over at the Young House Love blog, who dyed her wedding dress an awesome gunmetal gray color. I was also aware of the fact that she'd wanted to dye it black; I was prepared before I even began for things not to turn out as I'd expected.
Here is the extent of my experience with dyeing prior to this: once, when I was Prop Master of a play in high school, I dyed a pair of white cotton gloves yellow. Which is to say, I have almost no experience dyeing things. I was originally planning to use Rit dye, just because that was the only brand I knew, but our local art store didn't carry it. I ended up going with iDye, which had the advantage of having colors for both natural and manmade fibers. (Rit is only for natural fibers.) The top layer of my dress is 52% polyester and 48% rayon. Almost all of the other layers were 100% polyester. Rit was probably not going to work. iDye recommends that for blended fabric, one should combine the normal dye with a complementary color of their "poly" dyes. I got Crimson and Red.
Let me point out right now that these are powders. As soon as I opened a packet, tiiiiny invisible particles of red dye disseminated throughout the bathroom, landing in weird places and not showing up until after our next couple showers, when the steam condensed into little tiny drops of PINK all over the surfaces of our bathroom, even the ones I had covered with a layer of catalogue pages for safety.
For polyester, you're supposed to boil the clothes in the dye for 30-60 minutes. My dress was much too big for even our largest stock pot, so instead I boiled loads of water over the stove and poured it into a storage container in our bath tub. I then added the dye, and THEN THE DRESS.
My dress is in there! Eek! Note the gloves (otherwise I'd've had blotchy red hands) and the paint stirrers: You're supposed to agitate (stir) the dress the whole time! I leaned over the bathtub and listened to an episode of This American Life. After 45 minutes, I couldn't take it anymore, so next came the final, and for me, the hardest step: rinsing the dress. You rinse the dress over and over in cold water until the water runs clear. This. Took. FOREVER. That dress held a lot of dye, let me tell you. Then I put the dress on the fire escape to dry.
While it dried I scrubbed and scrubbed the bathtub, because it had turned hideously pink.
But then, by dinner time, it was dry. AND LOOK:
The light looks dim in this one, but the color of the dress is very close to what it is in real life.
I love it! Mind you, I had expected a crimson/red dress, and this is sorta mauve with cherry red accents. And the dress was "Dry Clean Only," which all sources say not to dye... and definitely not to soak in boiling water. As a result, the heat shrunk the cloth on either side of the zipper, so the bodice shrunk by about about 1/2 an inch... which sounds negligible, except the dress had fit me PERFECTLY before. I had to wear it around the house for a couple hours breathing really deeply to stretch it back out. But it fits fine now, and above all, I think it looks great!
The color looks a little washed out from the flash in this one, but you can see the sash better. And if you look at the bottom right hem, you can see that the layer of crinoline turned cherry red!
Now I just need an occasion to wear a puffy pink dress.
Labels:
around the house,
DIY,
happy,
household hints,
tips and tricks,
wedding
1.22.2012
simple mason jar centerpieces and decor
Centerpieces and table settings are things I never really thought about before planning our wedding. (Other things I'd never really thought about: wedding dresses, how kegs work, how far caterers will travel, how many weddings take place in Cooperstown in mid October, and maple syrup shots.) I mean, I know how to set tables and I have put vases of flowers, candles, or fruit bowls on a table to make it prettier. But I'd never before had to think about how to make tables for 70 people look not just pretty, but cohesive. The more I thought about it, the more I found wedding decorations as a whole to be quite daunting.
Enter my new BFF, THE HUMBLE MASON JAR. (The cage thing in the middle is for cards. We had a no-gifts wedding, but my sister got us this because she said we'd get cards anyway. She was right!) Ball mason jars are inexpensive, made in the USA, and available at all hardware (and probably most grocery) stores. They're also perfect for reuse: they are all presently in my kitchen, full of food, right now.
I bought two colors of ribbon (they matched the invitations!) and tied them around the mouths of the mason jars, then put matching (I'm so [color] coordinated!) candles in each one. We had 24 jars all together.
I'm also pretty proud of my camera idea in that picture. While we had two photographers (a professional one, and our friend Michael from the Dazed and Infused blog), I wanted candids. I put a tag on my personal camera saying "Sarah's Camera/Please take lots of photos with this," set it by the "guestbook," and ended up with almost 300 pictures of my friends and family. They were all silly and fun candids--just what I wanted!
Our professionals also took pictures of people taking pictures with it--so meta.
Our table settings looked like this:
Simple, clean, and pretty. The plates were Leafware's palm leaf plates. Disposables, I know, but they're made from fallen palm leaves and are totally biodegradeable, so we still get some green points, right?
Our favors were small bottles of local maple syrup. The husband and I spent a couple hours tying little ribbons onto them.
By the end of the night, the candles burned out completely. Removing the wax so I could reuse the jars was easy: I put the jars in the freezer for about 30 minutes, and the wax tumbled right out. I think I read about that little trick on Martha Stewart's website? You will note the maple syrup bottles in this photo have been opened. That's because a few intrepid wedding guests decided to challenge each other to shots of maple syrup.
Other than a few pumpkins and hay bales outside the venue (thanks, Dad!), the mason jars were our only decorations, but they went far in giving the already pretty venue some extra warmth. (visually, not physically. We had a fireplace for that).
Putting them everywhere drew the place together visually and made it seem like we had a plan. And the plan was mason jars. (Well, and getting married.)
Enter my new BFF, THE HUMBLE MASON JAR. (The cage thing in the middle is for cards. We had a no-gifts wedding, but my sister got us this because she said we'd get cards anyway. She was right!) Ball mason jars are inexpensive, made in the USA, and available at all hardware (and probably most grocery) stores. They're also perfect for reuse: they are all presently in my kitchen, full of food, right now.
I bought two colors of ribbon (they matched the invitations!) and tied them around the mouths of the mason jars, then put matching (I'm so [color] coordinated!) candles in each one. We had 24 jars all together.
I'm also pretty proud of my camera idea in that picture. While we had two photographers (a professional one, and our friend Michael from the Dazed and Infused blog), I wanted candids. I put a tag on my personal camera saying "Sarah's Camera/Please take lots of photos with this," set it by the "guestbook," and ended up with almost 300 pictures of my friends and family. They were all silly and fun candids--just what I wanted!
Our professionals also took pictures of people taking pictures with it--so meta.
Our table settings looked like this:
Simple, clean, and pretty. The plates were Leafware's palm leaf plates. Disposables, I know, but they're made from fallen palm leaves and are totally biodegradeable, so we still get some green points, right?
Our favors were small bottles of local maple syrup. The husband and I spent a couple hours tying little ribbons onto them.
By the end of the night, the candles burned out completely. Removing the wax so I could reuse the jars was easy: I put the jars in the freezer for about 30 minutes, and the wax tumbled right out. I think I read about that little trick on Martha Stewart's website? You will note the maple syrup bottles in this photo have been opened. That's because a few intrepid wedding guests decided to challenge each other to shots of maple syrup.
Other than a few pumpkins and hay bales outside the venue (thanks, Dad!), the mason jars were our only decorations, but they went far in giving the already pretty venue some extra warmth. (visually, not physically. We had a fireplace for that).
Putting them everywhere drew the place together visually and made it seem like we had a plan. And the plan was mason jars. (Well, and getting married.)
Labels:
DIY,
happy,
household hints,
tips and tricks,
wedding
1.16.2012
easy DIY wedding invites and time capsule guestbook
January is "sarah wants to write about her wedding" month! Last week I wrote about our awesome homemade vegan wedding food, and today I'll be showing you our homemade invitations and our time capsule guestbook!
Kevin (the husband) and I clean up pretty well (hee!), but we're pretty informal people. We got married on the porch (it was going to be the lawn, but it was really rainy) of a camp by the lake in my hometown, and had the reception inside right afterwards. With such an informal wedding, traditional wedding invitations, with their million inserts, envelopes within envelopes, and flowery language, didn't seem fitting. Since so much of our wedding was DIY, we opted to make our own invitations as well.
I began with a trip to Paper Source!
We were shooting for a guest list of 70-80 people, so we got enough materials to make 100 invitations, since 1.) we were sure there'd be a few mess-ups during the making, and 2.) we wanted extra invitations so we could invite more people as others said they couldn't make it.
We printed almost everything at home... except the RSVP cards. Our printer HATED the dark green cardstock we were hoping to use for them and spat it out all wrinkled and streaky, so we had to go with a beige-color at FedEx/Kinko's last minute. But that was pretty cheap, and we had to go there anyway to do all our cutting. (I would've just used scissors, but Kevin pointed out that I can't cut straight lines, and I think he had fun using the paper cutter there anyway.) Home to stamp everything, and voila!
Invitations! It's hard to tell in this light, but the birch trees on the invite are stamped in a metallic copper ink. I think it's so pretty!
And here's the inside of the invite. (Our wedding was at a private location, so I blurred out the name/s.)
One advantage to DIY invitations is certainly that you'll save money. The whole endeavor, even including our printing mishap that led us to FedEx/Kinko's, cost less than $120. But I would do the same thing even if it weren't more cost effective. We had a lot of fun putting together our invitations, and we were really happy with the way they looked. These weren't just store-ordered invites where we plugged in our names and dates. Making our own invitations really made them ours. They were as much "us" as the ceremony on the porch--pretty, simple, and informal.
AND I had enough leftover paper to do another project, the wedding DIY project I am still excited about: our TIME CAPSULE GUESTBOOK.
I got the idea from this Offbeat Bride guestbook alternatives post. They write about a Japanese product that lets guests write messages to put in a vial, then the couple burns a candle to seal the vial, then ten years later they burn the candle again to unseal it, and they can read the messages. I figured this would be an easy thing to DIY.
I cut up and stamped some of the paper left over from our invitations, and set them out with some nice pens next to an old mason jar. (We used mason jars as centerpieces, so this fit with our overall look.) I included a note next to it so guests would know what to do:
You can click to enlarge the image, but it says: "In lieu of a normal guestbook, we're collecting messages from our guests that we'll seal in the jar to be opened on our 10th anniversary. Please take a moment to record something (well-wishes, a memory, a message, a drawing, even just your name) to help Sarah and Kevin of 2021 remember that you were with us on our special day!"
People really seemed to enjoy writing messages, and I think this is a more fun alternative for me and Kevin... Because while I can't imagine us taking out and looking at a more traditional guestbook 10 years later, we're already excited to do that with this one.
The only catch: you have to have willpower. A bunch of people at the wedding said things like "you're not really going to wait 10 years, are you?" or "are you going to peek first?" No, you guys, that's the whole point! I don't want to open it until our 10th anniversary, it would spoil the fun! But if you can't trust yourself not to peek, you could seal it up with wax.
I am PSYCHED for October 2021.
Kevin (the husband) and I clean up pretty well (hee!), but we're pretty informal people. We got married on the porch (it was going to be the lawn, but it was really rainy) of a camp by the lake in my hometown, and had the reception inside right afterwards. With such an informal wedding, traditional wedding invitations, with their million inserts, envelopes within envelopes, and flowery language, didn't seem fitting. Since so much of our wedding was DIY, we opted to make our own invitations as well.
I began with a trip to Paper Source!
We were shooting for a guest list of 70-80 people, so we got enough materials to make 100 invitations, since 1.) we were sure there'd be a few mess-ups during the making, and 2.) we wanted extra invitations so we could invite more people as others said they couldn't make it.
We printed almost everything at home... except the RSVP cards. Our printer HATED the dark green cardstock we were hoping to use for them and spat it out all wrinkled and streaky, so we had to go with a beige-color at FedEx/Kinko's last minute. But that was pretty cheap, and we had to go there anyway to do all our cutting. (I would've just used scissors, but Kevin pointed out that I can't cut straight lines, and I think he had fun using the paper cutter there anyway.) Home to stamp everything, and voila!
Invitations! It's hard to tell in this light, but the birch trees on the invite are stamped in a metallic copper ink. I think it's so pretty!
And here's the inside of the invite. (Our wedding was at a private location, so I blurred out the name/s.)
One advantage to DIY invitations is certainly that you'll save money. The whole endeavor, even including our printing mishap that led us to FedEx/Kinko's, cost less than $120. But I would do the same thing even if it weren't more cost effective. We had a lot of fun putting together our invitations, and we were really happy with the way they looked. These weren't just store-ordered invites where we plugged in our names and dates. Making our own invitations really made them ours. They were as much "us" as the ceremony on the porch--pretty, simple, and informal.
AND I had enough leftover paper to do another project, the wedding DIY project I am still excited about: our TIME CAPSULE GUESTBOOK.
I got the idea from this Offbeat Bride guestbook alternatives post. They write about a Japanese product that lets guests write messages to put in a vial, then the couple burns a candle to seal the vial, then ten years later they burn the candle again to unseal it, and they can read the messages. I figured this would be an easy thing to DIY.
I cut up and stamped some of the paper left over from our invitations, and set them out with some nice pens next to an old mason jar. (We used mason jars as centerpieces, so this fit with our overall look.) I included a note next to it so guests would know what to do:
You can click to enlarge the image, but it says: "In lieu of a normal guestbook, we're collecting messages from our guests that we'll seal in the jar to be opened on our 10th anniversary. Please take a moment to record something (well-wishes, a memory, a message, a drawing, even just your name) to help Sarah and Kevin of 2021 remember that you were with us on our special day!"
People really seemed to enjoy writing messages, and I think this is a more fun alternative for me and Kevin... Because while I can't imagine us taking out and looking at a more traditional guestbook 10 years later, we're already excited to do that with this one.
The only catch: you have to have willpower. A bunch of people at the wedding said things like "you're not really going to wait 10 years, are you?" or "are you going to peek first?" No, you guys, that's the whole point! I don't want to open it until our 10th anniversary, it would spoil the fun! But if you can't trust yourself not to peek, you could seal it up with wax.
I am PSYCHED for October 2021.
Labels:
anniversary,
DIY,
happy,
tips and tricks,
upstate ny,
wedding
Subscribe to:
Posts (Atom)